
Update
5/17/2021: Spoke with SkyWatcher and they had me make some adjustments to my mount. They do not recommend users making these adjustments unless it’s needed. If you are having weirdness with your mount please contact SkyWatcher, their support is amazing! I still need to test this adjustment and will post an update as soon as the clouds pass.
5/18/2021: Astro Gadget contacted me to let me know they would release a firmware update to resolve the issue with the DEC -76:09:13 on the mount! The update took less than 24 hours to release and after install of the firmware the equipment is working flawlessly! I am very very pleased with this response and update from Astro Gadget! I have also updated this post as well to reflect my happiness with the company!!!
6/3/2021: YouTube video review
Forward
Fair warning this is a long review as I walk you through the install, setup, and usage in the field. Please take your time to get a full understanding of the product and my final thoughts at the end.
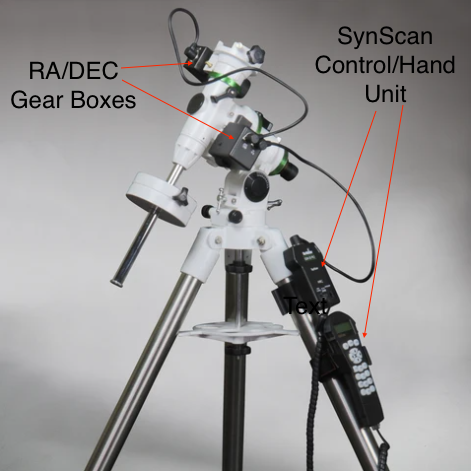
So I took a gamble and pulled the trigger on the EQStarProEQM35. The reason I say gamble is I couldn’t find any really good information on this kit or a review, anywhere. There is also another company that sells a similar unit but again no reviews or response from email. So what is the EQStarProEQM35? Well, it is a full belt drive replacement kit for the Sky-Watcher EQM-35 Pro mount. What this kit does is replace your RA/DEC gearboxes with upgraded motors and belts, and replaces the SyncScan/Hand Controller Unit with its own control unit. NOTE: I am not using the Hand Controller as I have the ASIAir Pro and I am using this mount for Astrophotography. My personal images are posted on Astrobin if you want to take a gander.
Ordering
The item can be ordered either online from their website https://astro-gadget.net/ or from eBay https://www.ebay.com/itm/313317507089. I opted for eBay as I reached out to the seller and received instant replies to all the questions I asked. When I say instant you have to remember there is a time difference between the USA and Ukraine. I sent an email to the main website email and never got a response? It could be an issue with Gmail as they are located in Russia so just know eBay is your best bet and you also get buyer protection. It might be a little more money but to me, it was worth it. I ordered the unit on April 16th, 2021, and it takes 5 business days for them to get the item ready as they build it all in-house. Once the item is ready to ship they use a carrier from Ukraine that then drops it off with UPS when it comes stateside. They were very good about communicating all this to me. Once UPS had the item it was delivered on May 6th, 2021. So all in all it took 2 1/2 weeks to arrive and one of those weeks was build time.
Arrival
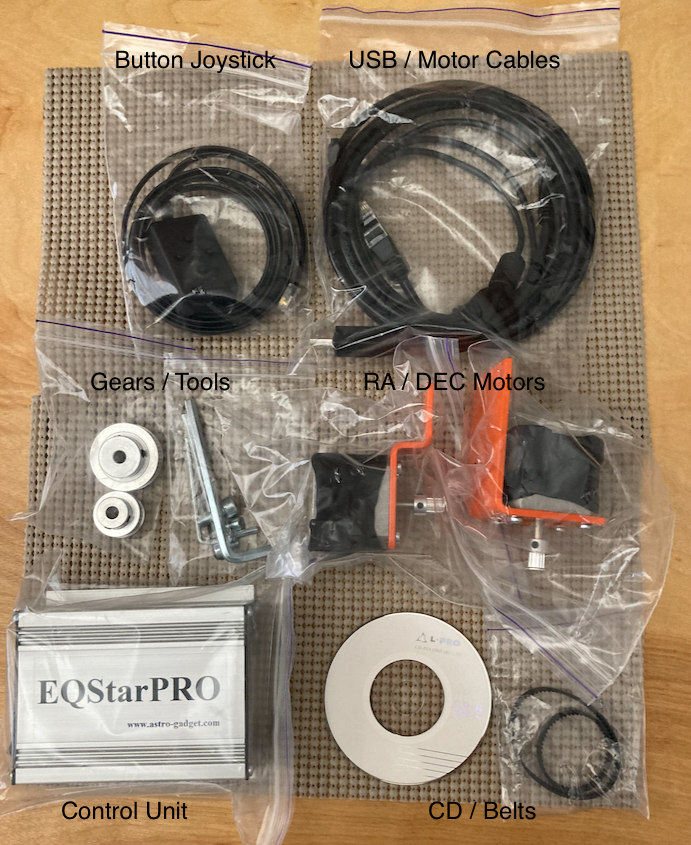
Everything arrived in a white box which was then wrapped in a bubble wrap envelope. Everything was nicely packed and secured. Here is all the parts that came in the box
Install
Sadly the CDRom did not have anything related to instructions just a PDF about the product, drivers, and some apps for Windows and one for Android. Since I am using the ASIAir Pro the ASCOM drivers are not important to me. I was going to wait to install the unit till the new ASIAir app releases with multi-star guiding but decided to pull the trigger and install it today May 10th, 2021 as I am seeing an issue with my mount for guiding and also calibration from the ASIAir Log files which shows problems with gear backlash.
Here are my instructions and a quick breakdown of the install. It took me about 25 minutes to break down the whole mount and disassemble the motors and install the new ones and then set up my mount and gear again. NOTE: I would recommend going through the instructions once before tear down as I took better pictures of the second motor install to give you a better idea of the tension for the belts and also how to slowly put on the belt.
Setup with ASIAir PRo
This setup can be used with ASCOM on PC or can be used with the ASIAir Pro. For the purpose of this demo, I am using the ASIAir Pro. It can be connected through the included USB cable or can be connected through Wi-Fi I have used both methods and would recommend the USB cable for simplicity sake.
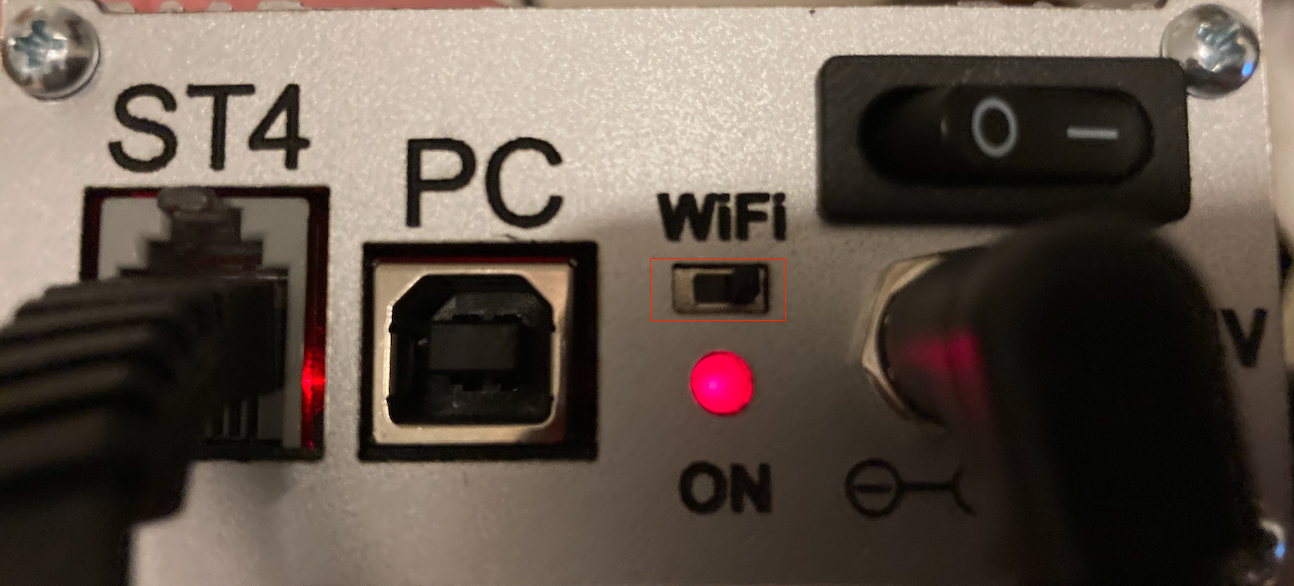
USB Cable Settings
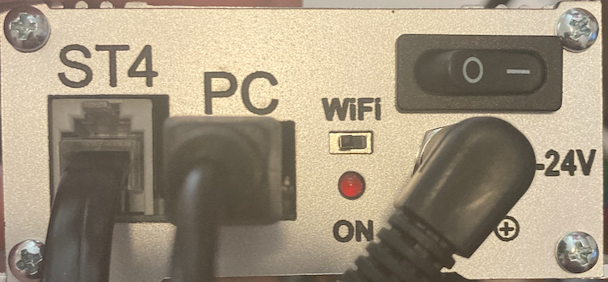
To use the USB cable simply connect it from the PC port on the EQStarPro and then connect it to the ASIAir pro.
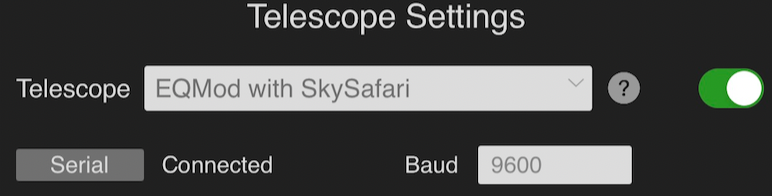
Inside the ASIAir Pro you can use the following setting of EQMod with SkySafari and Serial connector
Wi-FI Settings
First, we need to make sure to toggle on the Wi-Fi dip switch on the ESQStar Pro. When it’s working the red light will turn on. Don’t freak out when you turn on the unit and the ON light is not on, that ON light is for the Wi-Fi only. I turned on both my ASIAir Pro and then EQStarPro as the ASIAir is powering the EQStarPro
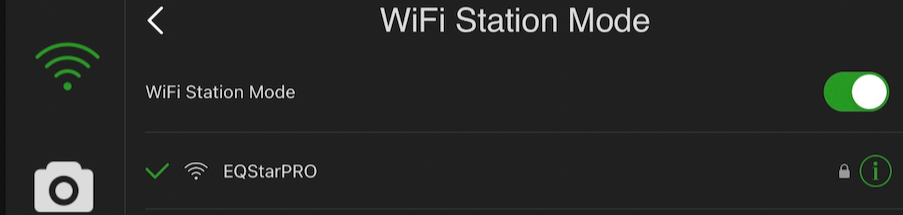
Next we need to go to our Wi-Fi and connect to the EQStarPRO network
Now connect to your home network or the ASIAir Pro network. Once connected launch the ASIAir and turn on Wi-Fi Station mode and connect the EQStarPro network
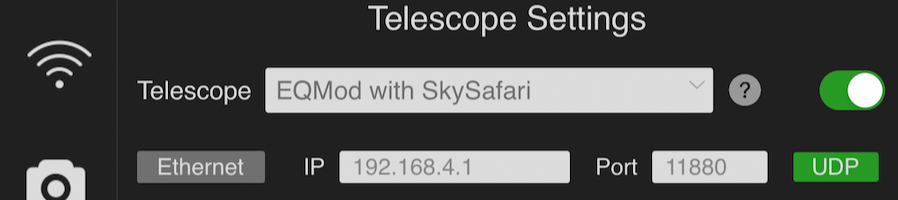
Once you are connected to the Wi-Fi Station mode we need to goto the Telescope settings and set the Telescope to the following settings
Field Test before EQStarPro Install
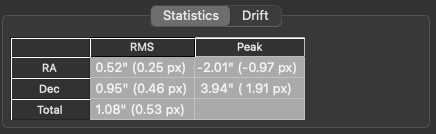
I tested my stock unit in the field on 5/8-5/9/2021 and was shooting M101. If you read my previous post on how to read your ASIAir Log files you will see my DEC was no Bueno.

Even though I had a great polar alignment using my little tweak I was still having issues with my DEC and even more issues with DEC / RA after the meridian flip however this was some of the best guiding I have had with the stock setup to date due to a more dialed in polar alignment.
1h10m8s of guiding before meridian flip

31m55s of guiding before meridian flip

30m21s of guiding after meridian flip

1h28m4s of guiding after meridian flip

Field Test after install of EQStarPro
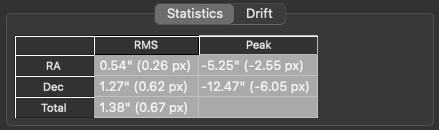
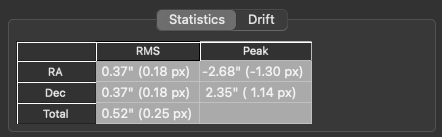
On 5/12/2021I was able to run another field test on NGC2043 with the EQStarPro. Since it’s not Saturday I can not run as long on the weekday but I did get a little data put together for a different object and did a recalibration and also guiding. As you will see my calibration is still garbage with the new EQStarPro upgrade.
Calibration backlash DEC with EQStarPro

When I asked Astro Gadget about the issue here is the response.
VENDOR RESPONSE: Such a calibration on the DEC axis may be due to backlash in the worm gear. Adjust and lubricate the worm gear. But in any case, the Auto Guidance will take into account the calibration results and will make corrections.
Due to this problem I opened a ticket up with SkyWatcher to work out the issue. I have a fix from them but have yet to be able to test due to clouds.
48m58s of guiding before meridian flip
47m33s of guiding before meridian flip
Field Test EQStarPro and ASIAir Update to Multi-Star
On 5/13/2021I opened up the ASIAir Pro application and it had a new background which means freaking UPDATE TIME!!! I ran the update and OMG the new multi-star guiding is just stupid!!!! Here is my session data from last night
1h2m51s of guiding before meridian flip!!!!!
30m13s of guiding before meridian flip!!!!!
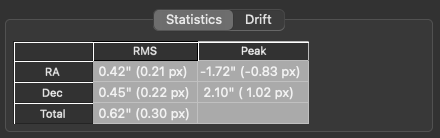
37.19s of guiding before meridian flip!!!!!
DEC worm gear or no worm gear problem the multi-star guiding is clearly the silver bullet! With just a software update it’s setting this mount in the same class of those $1500-3000 except for payload capacity!
EQStarPro / Pro’s & Con’s / Final Thoughts
Look nothing is perfect. Also, the complexity of setting up an automated mount to run star capture and making sure all the hardware works together from different vendors (ZWO, Sky-Watcher, and Astro Gadget) is not easy, it’s just not. So with a full disclosure here is what I have found.
- ✋ The EQStarPro did not include any instructions to install the parts to the mount. This is just unacceptable in my humble opinion however, what I am finding is this is the norm for Astrophotography. When I purchased my ZWO ASIAir Pro or any of my ZWO equipment there were no instructions in the box at all. It seems that Astrophotography vendors expect everyone to just know. If it wasn’t for websites like CloudyNights, or YoutTube learning Astrophotography would have been even more painful.
- ✋ The EQStarPro motors make a winning noise when turned on with the ASIAir Pro, something I didn’t know. If you Google it you will find hundreds of responses just like the vendor
- VENDOR RESPONSE: Any stepper motor makes a similar noise when operating in micro-stepping mode. Don’t worry, this is normal.
- 👍 👊 The EQStarPro for some reason sets the DEC to -76:09:13 out of the box. I worked with Astro Gadget and they released a new update to resolve this issue so the mount was set to +90:00:00!!!! It’s a simple little flash that needs to be done with the Wi-Fi turned off on the EQStarPro and the unit needs to be put into flash mode. There are instructions in the included PDF that came with the CD Rom and took about 2 minutes to flash from a Windows PC!
- 👍 The EQStarPro includes some applications and drivers you can use to change the settings and speed up the GoTo speed to get to objects faster. You can go as slow as 50 and as fast as 2000. Read the manual it’s actually in there! However, you do need a Windows PC to make these changes from what I can tell as the EQStarPro Setting application is for Windows only.
- 👍 The EQStarPro support has been really solid, they are in a different time zone than me but have been very responsive and have been assisting me with all my questions and also release a firmware update to resolve issues with the equipment!!
- 👍 Sky-Watcher issues with the DEC Worm Gear
- My open ticket with Sky-Watcher is still pending and I have a fix but due to cloudy nights, I have not been able to test. Support has been very good over email!
- 👍 👊 ZWO Multi-Star Guiding!!!! OMG, I love you ZWO!!! Listen I love the ZWO ASIAir Pro it’s an amazingly small device that powers your mounts equipment and has an amazing application that they keep improving upon. Just when I think it can’t any better and it does. Sure ZWO is leaning on INDI, PHD2, and other great open source projects but what sets them apart is attention to detail and also user interface. They took the time to take open source and make it proprietary and did a damn good job. I can think of another company that took FreeBSD as its base OS and knocked the socks off the world with their products? Give up? Apple!
So bottom-line was it a good investment? Yes, with an easy 5 STARS!!! As an honest review, I was a little frustrated at first as the vendor wanted me to take the steps to keep the mount at +90:00:00 with the ASIAir Pro
- Start ASIAir Pro / EQStarPRo
- Connect to the EQStar Wi-Fi
- Launch the SynScan < Press Connect < Click Restore. This sets the mount back to +90:00:00
- Connect the ASIAir Pro Wi-Fi
- Launch ASIAir Pro Application, Turn on Camera cooling, Polar Align, Find your Target, Focus on your Target, Turn on Guiding, Run your session
- When you are completed open Telescope Settings and press Start to GoTo Home Position
- Connect to EQStar Wi-Fi
- Launch the SynScan < Press Connect < Press Utility < Press Hibernarte < Press At Home Position < Turn off EQStarPro
- Connect to ASIPro Wi-Fi
- Launch ASIAir Pro Application > Launch Wi-Fi < Shut Down ASIAir Pro
However, after further discussion, Astro Gadget released a new firmware update to resolve the issues so DEC is always set at +90:00:00. These are the type of actions that I wish all companies would take! Thank you Astro Gadet for such a thoughtful product to improve my mount, and also support that knocked it out of the PARK!
Till next time…