So in my ever-evolving journey of Astrophotography, I keep opening new doors and continue to learn more and more about this hobby. It’s not just about capturing the stars that make this hobby so exciting or sitting outside enjoying the stars above, it is also about learning the science behind it that continues to intrigue me as well. Recently I made the move to a mono camera and with that comes more complexity in not just the setup or filters but learning the proper settings for narrowband and broadband filters which also brings up the discussion of dialing in the exposures, gain, and cooling. I have been spending a lot of time reading the following thread on CN (Cloudy Nights) and it’s freaking long, 48 pages long at the time of writing this blog https://www.cloudynights.com/topic/599475-sony-imx183-mono-test-thread-asi-qhy-etc/. In a nutshell, it discusses finding the sweet spot for this camera and to be able to get the best signal-to-noise ratio.
Well sure I can just follow the setting on my camera and move on with life right? Wrong! While the recommendations would work with the ASI1833MM Pro camera it’s not just about picking out some generic settings and clicking off pictures of the heavens above. If you go to ZWO’s website they recommend a unity gain of 120, however, everyone on CN says the “real” unity gain is 111. Now I could throw caution to the wind and just trust it however my silly brain wants to know how users figured the gain was 111 but the manufacture’s website still says 120? To start off on this little technical post here are two videos from Dr. Robin Glover which he explains exposure, gain, cooling, and the effects of the Bortles Sky in capturing your images along with stacking. The second video is his video on gain settings which was cut short from the first one.
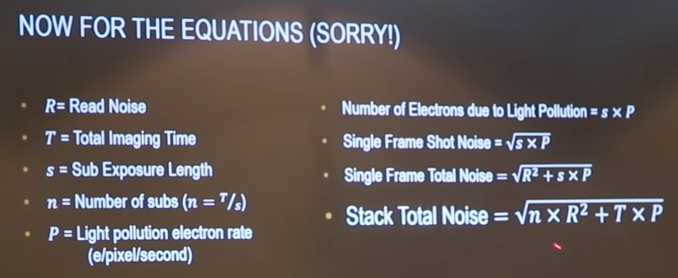
My takeaway from his discussions is that setting a gain setting of 111 or 120 is not the whole picture. Just like setting the camera to -10C is not the whole story. The whole story is finding the proper settings of my camera, or your camera and plugging in his equations to get the right data
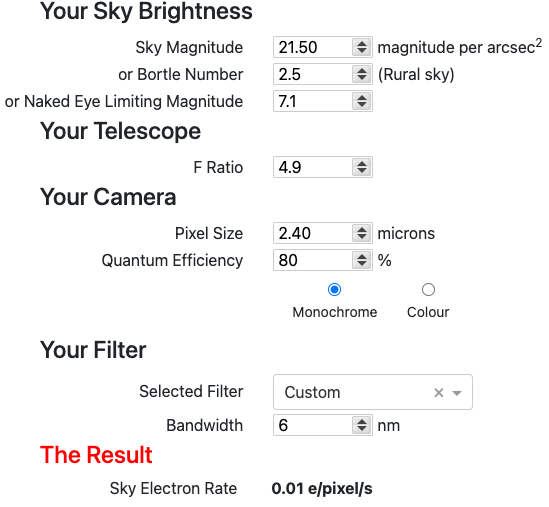
Light pollution electron rate
First, we need to figure out light pollution numbers which will be helpful with the rest of the exercise which is located here http://tools.sharpcap.co.uk/. You will need to know you’re sky brightness, you can either purchase the big dog Sky Quality Meter tool or be cheap like me and purchase either an iPhone or Android app for your phone. I rolled with the Dark Sky Meter for my iPhone and based on discussions on Cloudy Nights it’s extremely accurate up to a 0.1 difference from the physical unit which I have not been able to test as of writing this. After plugging my numbers into the calculator, I received the following data for my RedCat51, ASI183MM Pro, Astronomic 6nm filters, and sky darkness from the GNTO Observatory near my house using a physical SQM from one of our members. We will be using these numbers as we continue on but I urge you to plug in your numbers and follow along.
Read Noise
Sadly the only data I have from my camera is what ZWO supplies. When I asked ZWO for more accurate data like an excel spreadsheet with the plotted numbers I was sent packing. So I installed Sharp Cap and also the drivers for my ASI183MM Pro from ZWO on my Windows 10 box. Since I appreciate what Dr. Robin Glover has offered for free, I opted to pay for a 1-year license of Sharp Cap which set me back $14.56.
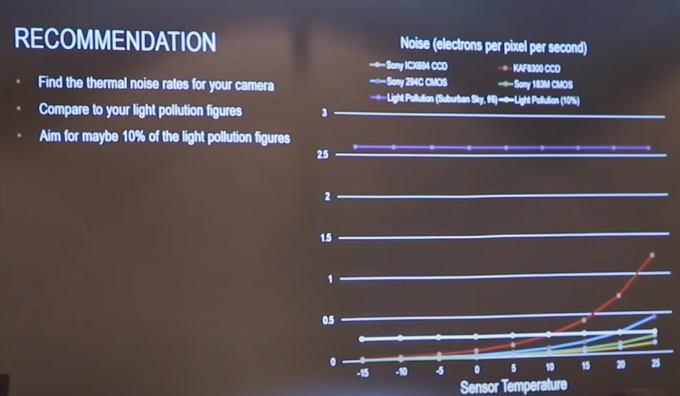
So before running the test one of the things Dr. Glover mentioned is to look at your manufacturer’s graph for thermal noise for your camera. So looking at the Dark current vs. temperature we see the following graph from ZWO. As we can see in the graph we are picking up a very small percentage when cooling the camera from 0.00391 at the max cooling of -10C to 0.0625 for minimum cooling at 25C.
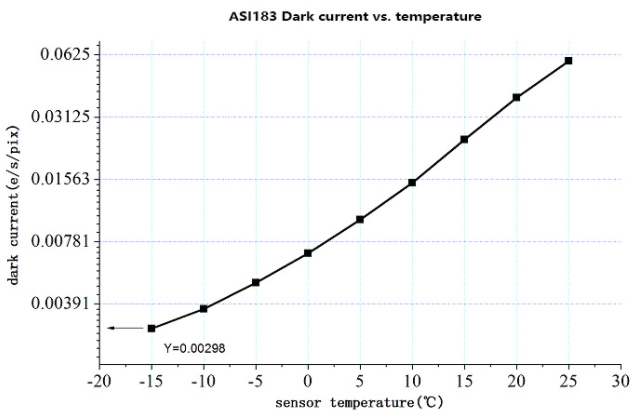
As Dr. Glover mentioned in his presentation you want to set the cooling to 10% of the light pollution so in my case take 2.5 for the Bortle Class and divide it by 10 which gives me .025. So in reality I should be cooling my camera down to roughly 15C and not the -10C I have been doing with the ASI183MM Pro for the dark current.
So after installing the Sharp Cap application and the camera drivers I proceeded to run the settings on the camera at 15C and -10C just to compare the read noise levels and here is what I am seeing based on that data. You first need to choose your camera from Camera < and choose it. Then you need to play with the cooling settings of your camera on the right side under Thermal Controls. Once there turn on the cooler and set your desired temperature. Once the camera cools down to the temperature you need you then can go to Tools < Sensor Analysis to run the tests. During the test, it will tell you when to cover the lens and when to uncover it. Here are my results using excel based on all the numbers it spits out at 8bit
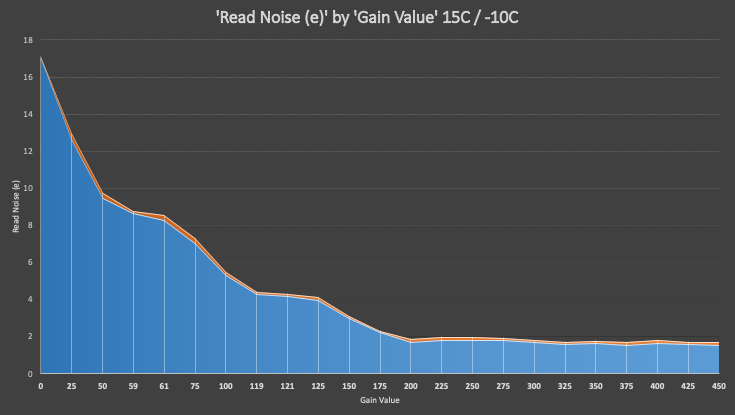
So what is this? Well, this is a base graph based on the Read Noise (e) and Gain Values of the ASI183MM Pro. The small reddish color is the difference between 15C cooling and -10C cooling. So as you see there is very little return on cooling the camera below the 10% Dr. Glover mentioned in his video. So at this point, it’s hurry up a wait till the skies clear and the monsoon stops raining on me. Once I can get back outside again I will be going back and use SharpCap to capture more data but for now, I will share what I have. Till next time.